What is the Core?
The core is comprised of the abs, glutes, hips, lower back and their surrounding muscles. All movement begins in the core, and each muscle group works together when performing various movements. The following activities and many others would be difficult if the core is weak or compromised:
- Getting in and out of bed
- Standing up
- Picking up a bag of groceries
- Walking up a flight of stairs
- Running
- Throwing a football
- Riding a bike
Surprising Health Benefits of a Strong Core
Having a strong core is more than having six pack. In addition to the previous examples, there are many benefits of having a strong core:
1. Decreased risk of back pain and injuries. In many cases, lower back pain may be the result of having a weak core. According to recent statistics from the Global Burden of Disease1:
- Lower back pain is the leading cause of disability worldwide
- Back pain is the second most common reason for visits to the doctor’s office
- More than 50% of all working Americans have back pain annually
- Americans spend $50 billion each year on back pain medications
2. Improved posture. A strong core helps to keep the muscles aligned, which helps prevent slouching. As a result, a person may be able to or stand for longer periods of time without experiencing pain or discomfort. Bad posture can have negative effects on health as well:
- A study conducted at San Francisco State University found that students who slouched while walking had increased feelings of depression compared to those who skipped down a hall2
- Poor posture constricts the internal organs, and has been linked to constipation, acid reflux and other digestive issues
- A study at the University of Queensland in Brisbane found that for those 25 and older, every hour they spent slouched in front of the television decreased their lifespan by 22 minutes3
- A study conducted by researchers at the University of Leicester and Loughborough claims that sitting for long periods of time increases a person’s risk of diabetes, heart disease and death by 112%, 147% and 90% respectively4
Having a strong core is essential to good health, and using an exercise ball is an excellent way to make that a reality.
Choosing the Correct Exercise Ball
Exercise balls go by many names (stability ball, yoga ball, etc.) and come in different sizes, so it is important to use a ball that is appropriate for your height:| Height | Ball Size |
|---|---|
| 4’11” to 5’4” | 55 cm |
| 5’4” to 5’11” | 65 cm |
| 5’11” to 6’7” | 75cm |
Exercise Ball Core Exercises
When performing exercises on a stability ball, the entire core and stabilizer muscles are used to maintain balance. The following exercises are excellent for strengthening this important muscle group:Hips and Lower Back
These core exercises place more emphasis on the hips and lower back:1. Ball Bridge
- Lay on back, press heels into exercise ball
- Exhale and slowly lift hips off ground towards ceiling
- Pause and slowly lower to starting position
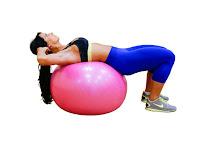
2. Hip Raises
- Plant your feet on the floor
- Clasp your hands behind your head
- Rest your shoulder blades squarely on the exercise ball
- Exhale and raise your hips up towards the ceiling
- Inhale and slowly lower to starting position
- Repeat
3. Ball Hyperextension
- Kneel in front of exercise ball
- Press abs and hands onto ball for stability
- Straighten legs and put all your bodyweight onto the ball
- Clasp hands behind head
- Exhale and slowly lift torso up towards ceiling
- Inhale and lower to starting position
- Repeat
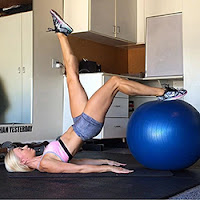
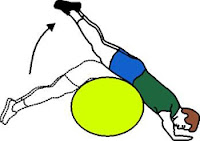
4. Ball Reverse Hyperextension
- Lie on top of exercise ball
- Keep legs extended and hands on floor for balance
- Exhale and slowly raise legs toward ceiling
- Inhale and slowly lower legs to starting position
- Repeat
5. Side Lying Leg Lifts
- Lay on your left side, with ball underneath your torso
- Wrap left arm around ball and hold stability ball with right arm in front of your chest for stability
- Exhale and slowly raise right leg towards ceiling, slightly above parallel position
- Inhale and lower to starting position
- Repeat
- Perform same movement while laying on your right side
Core Ab Exercises
The following core exercises place more emphasis on the abs:1. Exercise Ball Crunches
- Lie on back and place exercise ball between your feet
- Clasp hands behind your head
- Raise feet off ground, keeping knees bent
- Lift shoulder blades off the ground and slightly twist your body, pointing left elbow forward
- Simultaneously keep left leg straight and bend right knee towards you
- Straighten right leg and immediately bend left knee towards you
- Bring left elbow back to neutral position and point right elbow forward
- Repeat
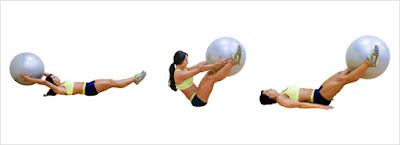
2. Leg Raises with Exercise Ball
- Lay on back with arms and legs fully extended
- Hold ball with both hands
- Simultaneously raise arms and legs towards the ceiling
- Grab exercise ball with legs and squeeze
- Lower arms and legs simultaneously
- Raise arms and legs
- Grab ball with arms
- Lower legs and arms
- Repeat
3. Plank on Exercise Ball
- Rest forearms on exercise ball
- Keep legs straight and hold positon for 30-60 seconds
4. Exercise Ball Crunches
- Rest lower back on exercise ball
- Keep feet firmly planted on ground
- Fold arms across chest
- Lean back and look upwards towards the ceiling
- Keeping feet planted, bring torso up to 45 degree angle
- Repeat
5. Exercise Ball Rollout
- Begin exercise on your knees in front of an exercise ball
- Place hands on top of exercise ball
- Slowly let the exercise ball roll out away from you
- Fully extend body with exercise ball resting on forearms
- Slowly return to upright position by allowing exercise ball to roll back up to your hands
- Repeat
Warm up Exercises
Before starting an exercise program, a five to ten minute warm up is advised. Here are two warm up exercises with the stability ball:1. Squat and overhead press with Exercise Ball
- Hold exercise ball in front of you
- Squat and raise ball overhead
- Repeat
2. Side Bend
- Stand with exercise ball overhead
- Slowly lean over to left
- Return to center
- Slowly lean over to the right
- Repeat
Core Exercise Routines
Core Workout #1The following stability ball exercise programs are designed to strengthen the entire core:
- 50 Jumping jacks
- 25 Squat and overhead press w/exercise ball
- 15 Side bends
- 20 Ball bridges
- 25 Hip raises
- 30 Crunches
- Plank (60 seconds)
Core Workout #2
- 50 Jumping jacks
- 25 Squat and overhead press w/exercise ball
- 15 Ball Hyperextensions
- 15 Ball reverse hyperextensions
- 15 Side lying leg lifts
- 50 Crunches
- 25 Leg raises
- 10 Exercise ball rollouts
Start using a stability ball today. Your body will thank you!


